Using Terraform Modules from Github in Azure DevOps
When you start working with Terraform, it won’t be long before you end up writing your own Terraform modules. Modules allow you to package up our terrform code into logical, reusuable units of work, that you can reuse within your team, and you can even share them with others. Which is what Grunt works has done with their impressive collection.
If you do end up creating your own modules, you should be testing them and version controlling them.
When using modules within your terraform configurations, you shouldn’t really be downloading and packaging these manually. Fortunately Terraform has a fantastic feature which allows you to configure your terraform code to pull these modules directly from a git repository.
I’ll take you through how to set this up to work with Azure Devops and Github repositories.
This was a challenge, me and my team had to overcome when we were looking to deploy our Terraform code from our Azure Devops pipelines, hopefully I’ll save you from some of the pain we went through.
Referencing your custom terraform modules in Git
To be able to use common terraform modules directly from a git repo, the first thing you need to do is amend your terraform configurations to call out for those modules from a git repo instead of a local folder. This change is rather single, it’s just a case of changing the source field to reference a git url rather than a folder path, cool eh?
SSH or HTTPS?
If you are accessing an unsecured repo, then using HTTPS is most likely be the easiest solution. You can grab the url from github, but it’ll look something like https://github.com/codewithadam/terraform-common-modules.git
For repositories that are secured, whether in private Github repos, Azure Repos, or some other flavor, using an SSH key is often the easiest solution, than trying to work with credentials over HTTP. Even more so if you are going to be running your terraform code on a non-windows machine such as a linux build agent.
for SSH the url will looking something like: git@github.com:codewithadam/terraform-common-modules
Do note that with either method, both have the username/organisation specified in the urls.
Changes to make to your Terraform files
So you have your git url, now, as I mentioned above, you need to update your terraform files to look at git rather than your folder path.
module "az-function-app" {
  source       = "c:\\Dev\\terraform\\modules\\functionApp"
  app_name     = "BadgerDuck"
  regions      = ["uksouth", "ukwest"]
}
To switch to use of the url versions update the source from a folder to a url:
https
module "az-function-app" {
  source       = "https://github.com/codewithadam/terraform-common-modules.git"
  app_name     = "BadgerDuck"
  regions      = ["uksouth", "ukwest"]
}
ssh
module "az-function-app" {
  source       = "git@github.com:codewithadam/terraform-common-modules"
  app_name     = "BadgerDuck"
  regions      = ["uksouth", "ukwest"]
}
If you are lucky enough to be using an unathenticated repository then all your need to do is run terraform init and your modules should download and work as they did before, if however you are using an authenticated repo using ssh then further steps are required, this is how I ended up setting this up.
Setup SSH Keys
To allow your local machine or build agent to access the authenticated repo via ssh, you’ll need to setup an SSH key, I’ll take you through the steps to set this up in Azure DevOps and in Github.
Generate an SSH Key
The very first thing you’ll need to do is to generate a public and private key pair that you can use for authenication. OpenSSH is capable of doing this and is available on most systems. Open a command prompt and run the following command, replace the with a string that works for you, I used the name of the module collection.
ssh-keygen -C "<your filename>"This command will ask you where you want the files to be saved, enter a full folder path and file name c:\ssh-keys\<string>, you’ll also be asked for a passphrase, this is simply a password to protect your keys, you can immediate hit enter twice and not enter one or you can take the extra step and setup a password. Once all done you’ll get two files
- this will be your private key
.pub - this will be your public key
Adding your key to Azure DevOps
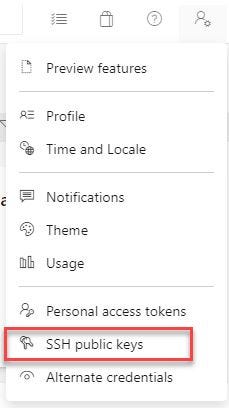
Open up the Azure DevOps Port, and click on the settings icon at the top right of the screen and go to “SSH Public Keys”
Click on the “New Key” button, enter a name for your public key, make it make sense as to what it’s for, then put into the “public Key Data” section the contents of the <your filename>.pub file, this will start with ssh-rsa your account is now setup to use SSH keys.
Adding your key to GitHub
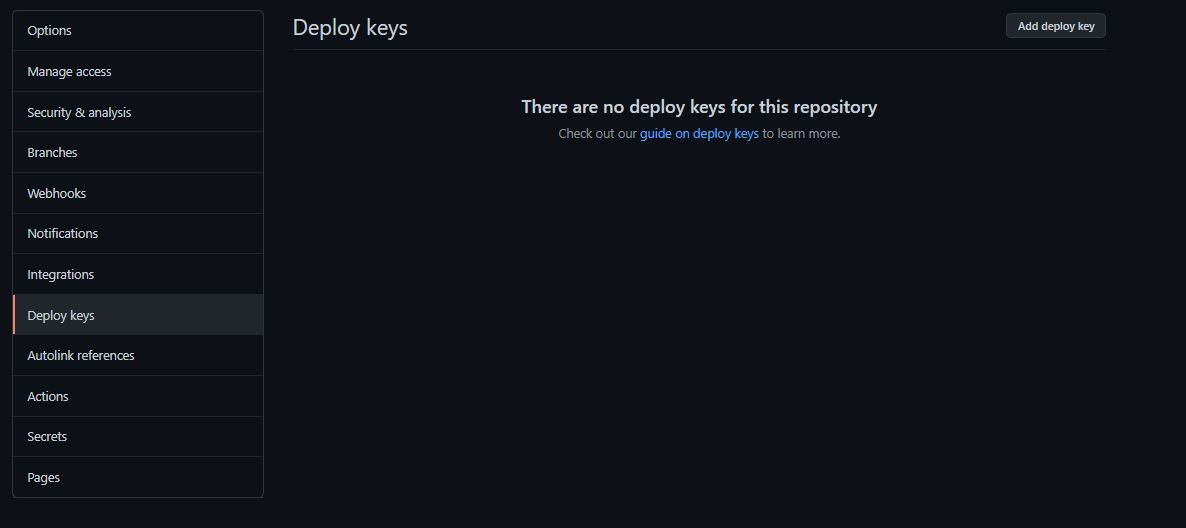
Within github, go to your repository, click on settings, then on the left click on Deploy Keys.
Click Add deploy key, in the title field, give it a meaningful name, enter the contents of your <your filename>.pub file which will start with ssh-rsa, you can then select Allow write access if you need your pipeline to be able to make changes to the repo, otherwise leave it unchecked for read access. Then click Add key.
Accessing Terraform Modules in Azure DevOps Pipelines
With our Terraform code files referencing git repos for their supporting modules and with our SSH keys setup, we can now look at getting Azure DevOps Pipeslines setup to be able to run these Terraform build and deployments.
As our repositories are all authenticated and used SSH we need to setup our pipelines with the correct information to connect over SSH.
Upload your private key
Firstly, we need to add our private key, the one we generated earlier into Azure DevOps, without it, we won’t be able to connect. Now being a secure key, we need to store this securely. Thankfully, Azure Pipelines has a method to handle this, within the Library we can upload a secure file, isn’t that handy!
In your Azure DevOps project, go to the pipelines section, then select Library, in the top menu you’ll see a section called Secure Files click this.
Click on the + Secure File button and upload the <your filename> from before, not the one ending in .pub.
Known Host
This is something, that I missed on the first go at this. An important bit of information that Azure Devops needs, is the known host entry. This information identifies the server we wish to connect to and tells Azure DevOps to trust it, this stops it prompting us to ask if it’s ok to connect, which is ideal, as during a build/release we have no way to answer that prompt.
To get the known hose you need to run the following command:
ssh-keyscan <hostname of your repo>replace <hostname of your repo> with the actual hostname of the repo you are connecting to. For example, if you were using github like us then it’ll be github.com or it’ll be ssh.dev.azure.com if you are using an Azure DevOps repo. This command will return a block of text, you’ll need to copy this test, see the bits highlight below.
Create the DevOps Pipeline
We now have done all the pre-work and have the values we need to successfully create a pipeline. The very first thing we’ll need to do is setup some variables to hold these values. Because these values are all sensitive varibles, we’ll create them using the variable pane in the DevOps pipelines, we’ll need to create the following varibles.
known_host- this will contain the text collected from the ssh-keyscan we collected abovessh_public_key- this will contain the contents of your<your filename>.pubssh_passphrase- if you entered a passphrase to protect your generated key, you should enter this here.ssh_privateKeyName- this will be the name of<your filename>which you uploaded to secure files
With the variables configured, we can move onto setting up the pipelines, the first task we’ll need, is a take to install an ssh key, without this Terraform won’t be able to use our SSH keys. We’ll need to use the Install SSH Key Task. The Yaml will look something like this.
task: InstallSSHKey@0
  inputs:
    knownHostsEntry: $(known_host)
    sshPublicKey: $(ssh_public_key)
    sshPassphrase: $(ssh_passphrase)
    sshKeySecureFile: $(ssh_privateKeyName)
Deploy your Terraform config
With the SSH keys setup and our Terraform files all referencing the git repo using SSH, that’s it, it should just work now. Now when we run Terraform init as a part of the build pipeline it will use the installed keys to automatically checkout your modules directly from git.
Congratulations! Hopefully, you found this without spending hours look into why it’s not working!
Versions and Branching
The url’s mentioned above will checkout your modules from the main/master branch of your repository. Sometimes you’ll want to checkout a specific branch or tag. Such as:
you are developing a new version of the module on a branch and you want to test it
you’ve tagged a release of your module with a version number and want to lock yourself to that version
Both very sensible reasons, if you want to use a specific version or tag then all you need to do is to amend the url used in your Terraform configurations to use the ref attribute, here you can specify the branch or tag name.
getting a specific branch
module "az-function-app" {
  source       = "git@github.com:codewithadam/terraform-common-modules?ref=develop"
  app_name     = "BadgerDuck"
  regions      = ["uksouth", "ukwest"]
}
getting a specific tag
module "az-function-app" {
  source       = "git@github.com:codewithadam/terraform-common-modules?ref=v1.0.0"
  app_name     = "BadgerDuck"
  regions      = ["uksouth", "ukwest"]
}
Gotchas
Terraform expects you to have 1 git repo per module, if you don’t conform to this you’ll get an error Error: Failed to download module with a further explanation fatal: Could not read from remote repository.
If you look at how The Terraform registry is laid out this will make sense.
Wrap Up
Hopefully this article has been helpful,I was stumped for a while, hence this article, now I can’t take entire credit for this, as the missing piece of the puzzle was given to me by Sam Cogan, it was his fantastic article which led me to the known_hosts issue.


do you have a post on how you manage your module repos and what branch strategy and testing someone should do before versioning them?